Step-by-step reference — LTL + Final Mile
PurposeThis guide covers building an LTL shipment that includes a final mile delivery leg, using a single load with two trips instead of two separate shipments and bills of lading.
Key Terms- Shipment — a single origin-to-destination record.
- Load — the structure that groups one or more shipments and manages multiple legs (trips) under one record.
- Trip — a leg within a load (e.g., the LTL leg and the final mile leg).
LTL shipment is created: Go to Build > Manage Shipments to create and save the LTL shipment.
- This will include the shipment pickup location and the final consignee destination. Be sure to click Save, not Get Rates (rating happens later).
Determine the hand-off point (Exchange Delivery location of the final mile carrier):
- Confirm with the final mile carrier the address of the Exchange Delivery location.
- This will be added when the load is built.
- Note: The final mile carriers terminal should be added as an Exchange Delivery on Trip 1.
Once the items above are completed, you're ready to build your 2-trip load.
Building the Load- Go to Build > Load. Expand the Shipment section, locate and select the shipment you just created, then click the truck icon in the top right to add it to the load. (If the shipment doesn't appear, its status likely needs to be updated to "New" — go to Manage Shipments to update it, since this section only shows shipments in "New" status.)
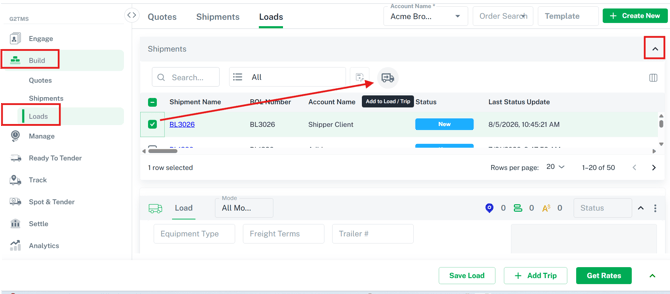
- Once the shipment is added, you'll see a blue circle indicating 2 stops. Click it to expand the view, showing your LTL shipment stops. Click Add Stops and choose Exchange Delivery.
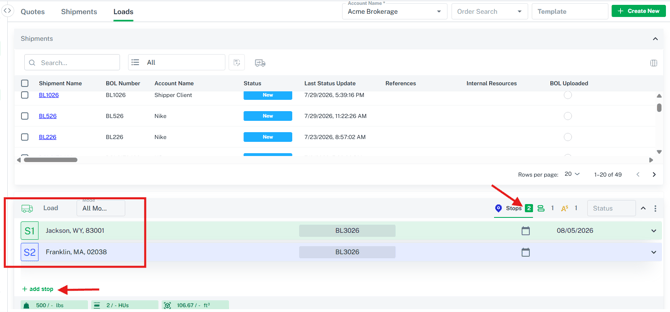
- The view now reflects 3 stops.
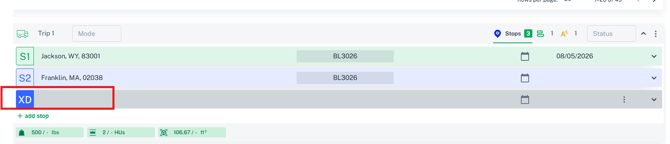
- Click the "XD1" stop and drag it up between "S1" (original pickup) and "S2" (final consignee destination). This creates the second leg of your trip for the final mile portion.
- Click the caret on Trip 1 to expand the Exchange Delivery point and enter the address received from your final mile carrier. Then expand "XP" (Exchange Pickup) under Trip 2 and enter your requested pickup date (an estimate is fine — it's used for rating).
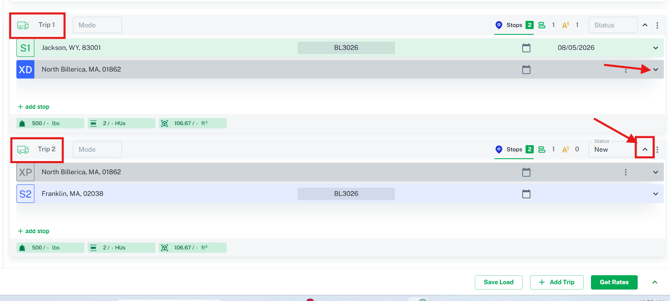
- Expand the "XD1" stop via the caret on the far right and enter the address.
- Your load screen should now show:
- Trip 1: S1 — original pickup address; X1 — Exchange Delivery Point (final mile carrier's pickup address)
- Trip 2: X2 — Exchange Pickup Point (final mile carrier's pickup address); S2 — consignee's address
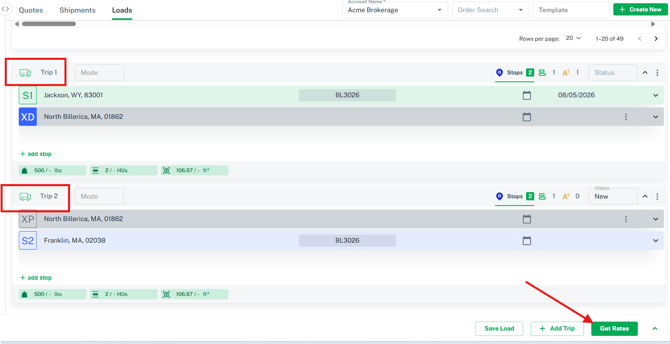
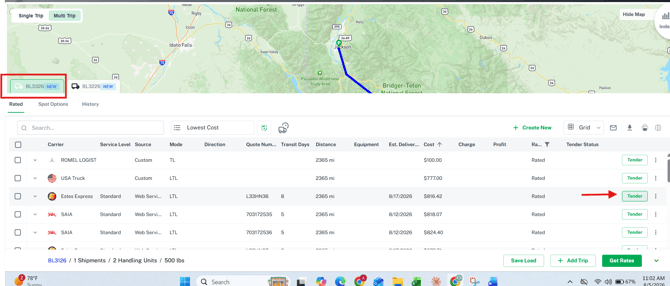
- Click Get Rates to save the load and generate rates. The rate drawer expands and your LTL rates generate. Choose your desired LTL carrier rate and click Tender to schedule pickup.
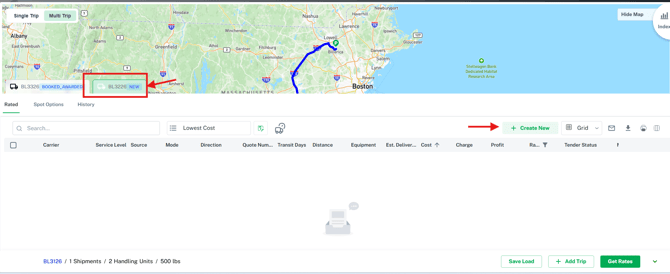
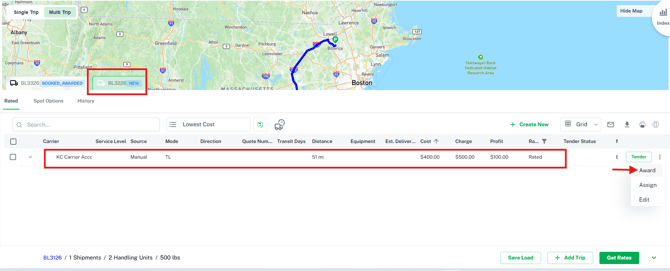
- Click the second tab in the rate drawer, then Create New to build the rate received from your final mile carrier. After saving, select the manual rate you just created, then click the 3-dot menu to Award (if you've already agreed to the rate) or Tender to send it.
- Note: Tender respects the carrier's pre-set communication method (API or email). Award bypasses that and assigns immediately — mainly used to lock in expected costs.
- After customer approval, award both legs. Awarding generates a master Bill of Lading — one cover page for the whole load plus individual pages for each trip — replacing the old process of separate BOLs per leg.
Once you've completed the above steps, you can go to Manage Shipments to access your LTL shipment, view BOL documentation and tracking updates can be shared with your customer.

You can also go to Manage>Loads and both legs of the shipment will be showing, each with their own BOL ID, associated by the same Parent BOL.

There will be two BOL documents generated.
To obtain the BOL document for the customer: Go to Manage>Shipments and locate the LTL shipment and access the BOL document. This will display the pickup and consignee information.
To obtain the BOL document for the final mile portion: Go to Manage>Loads and locate the shipment for the final mile carrier. There is a master BOL supports both legs and there is a seperate page for each portion of the trip. The BOL follows VIX standard formatting: PO numbers aggregate at the top level, with detailed classification at the pallet level.
Tracking the Shipment:Tracking the LTL shipment should automatically occur leveraging the webservices connection with the LTL carrier. You can go to Manage>Shipments, and click Tracking to send your customer the tracking link for the LTL shipment. The final mile carrier (if not integrated), the tracking updates will need to be handled manually by going to Manage>Load, and using the Manual or Quick Status action to update tracking.
Managing Financials:
The company pays each carrier individually based on their specific trip leg.The Load will reflect 2 seperate payable records (Expected Costs). One for the LTL carrier and one for the final mile carrier. Allowing you to eventually audit and approve each seperately based on the individual carrier bills received from each carrier. In addition, there will be one receivable record generated allowing you to invoice your customer.