How to Connect the Falvey Insurance Plugin
Falvey Insurance offers comprehensive full-value, all-risk domestic and international shipping insurance
Connect the Falvey Plugin using your Falvey credentials and add any additional services directly within G2Mint. Please Note: Falvey does support LTL and TL as Modes
-
Select Add-Ons & Plugins from the My Account tab
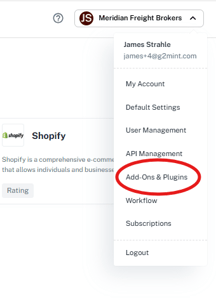
- Select Falvey in the Insurance section of our Plugins
- Select Connect
- Enter your API Username, API Password and API Key for Falvey. If unavailable, reach out to your Falvey representative
- Optional Step: Add an Accessorial Fee Name and Amount. This is an optional "service charge" that can be added as additional revenue for the Broker/Shipper.
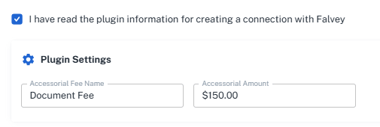
- Select Test Service, and then Save once approved.
- Now that the connection is made, the option for Declared Value will be available when Building/Editing a Quote, Shipment or Load. To add insurance, enter a Declared Value, and then select Additional Insurance.
- To accept that Rate, select Accept. Once accepted, the financial record will be updated, and the rate will be updated in the Rate Drawer
00:00: This tutorial guides you through adding Additional Insurance to your shipments using an
00:04: Insurance plugin.
00:06: Before starting, ensure you have access to your brokerage account and gather the
00:10: necessary API credentials for the insurance plugin.
00:13: Click My Account to access the main dashboard where you can manage your accounts and settings.
00:18: Click "Add-Ons & Plugins".
00:21: Click "Connect" to activate, or "Edit" to modify your plugin.
00:25: Enter required Credentials for the Plugin and accept Terms of Service.
00:30: If desired, enter an "Accessorial Fee Name" and Amount to add an additional
00:34: fee related to insurance coverage (similar to a mark-up plan).
00:39: Test the Service, then click "Save" to apply and store the change.
00:44: Click shipments in managed to apply the additional insurance coverage.
00:48: The shipment must be booked or rewarded, or Beyond as a status.
00:52: A carrier needs to be assigned.
00:55: Once Edit mode is enabled, enter the "Declared Value" to insure.
00:59: Click additional Insurance to enable or add the insurance coverage option
01:03: to the shipment.
01:05: Click accept to confirm and apply the additional Insurance to the shipment.
01:10: You have successfully added additional insurance to your shipment using the Insurance
01:13: plugin. Verify that the insurance fee and declared value are correctly
01:18: applied in the shipment details. This will be visible in the Rate Drawer Grid.