Last Updated: October 2025
Applies to:
Brokers
Common Scenario(s)/Challenge (s):
For Brokers looking to correct the amount after an invoice was already approved
Solution Overview:
This step by step starts with the key steps needed to correct the amount on a previously approved client invoice.
Step by Step:
(This assumes you've already approved your Expected Charge and created an invoice)
How to correct the total amount on an invoice?
A client invoice that has already been approved or in ready to invoice status will require you to first update the status of the invoice back to 'new' status before changing the total amount and re-approving at the corrected amount.
- Go to the Settle>Invoices and click on the Invoices tab.
- Search by your shipment ID to locate the appropriate Invoice record in the grid.
- If the invoice status is in 'Approved' or 'Ready to Invoice' and it has not yet been sent to your customer then it is ok to update the status of your invoice to allow you to edit the charge amount and re-approve. IF the invoice has already been sent to the customer then it is best to create balance due invoice instead.
- Select the appropriate invoice record in the Invoices grid:
- Click on the 'Update Status' icon
 located at the top section of the grid.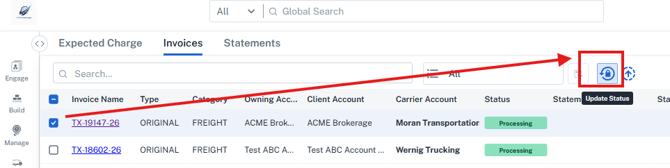
- Choose 'New' as the status and click Confirm. This will revert the invoice approval and put the record back into new status allowing you to edit the amount and re-approve.
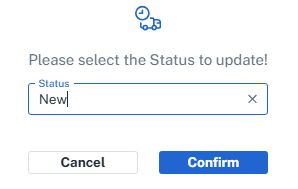
- Now go to the Charges grid and locate the record and click on the charge name to open the approval screen (now that the record is no longer an approved invoice it will live in this grid).

- Enter the corrected amount you wish to approve and click approve OR you can click the edit pencil and update the amount in that screen.
- Then click Approve and the amount entered will be applied to the new Invoice that is generated.
- Your new invoice amount will not be reflected in the invoice grid.
Related Articles:
Still Need Help?
If you need further assistance from our support team please email support@g2mint.com